Godzilla Holiday cards
My cards for 2019 were not just Happy Holidays cards, but also Goodbye cards. Right after Christmas, my husband and I moved from Boston back to Tokyo.
I usually write something for my holiday cards. One year I wrote a poem that drew a parallel between holiday shopping/expectations and living under an overbearing regime, another year I modeled a piece after The Raven by Edgar Allen Poe (2016 was a tough holiday season), and one was a Rickroll.
For 2019, I put my Cricut to use and designed a card with a wheel-based mechanic with Godzilla as the central idea. And I wrote a haiku, because it fit the Japan theme with minimal word-writing.
I put this all together in the Cricut interface. I have some qualms with Design Space (can't rename layers, for example), but that's how it turned out. Next time I do something similar I'll use a different program.
The blue rectangle is the open card, the vertical dashed line is the score line for the center fold, and the yellow shape is the cityscape shape.

I hid the cityscape layer and placed a circle with the center roughly where I wanted the wheel hub to be, and used that to size and place the Godzilla shape and the buildings on top of it. I paid attention to where G would hit the bottom at the start position and how far it could rotate before it would be stopped by the buildings. Then I placed the buildings to find the balance between covering too little and covering too much.

To test the mechanic design, I could select both Godzilla and the circle and use the rotation tool. This is what the purple circle is for, it's not part of the final design.

There was a lot of trial and error and tweaking, but I knew the final design would work before I cut anything out.
The cityscape underwent some development, from only the inside left panel to both panels on the inside to a single shape that formed a kind of sleeve to give both the front and inside a full cityscape, plus glue tabs. (If this sounds complicated, it's not as bad as I'm describing. Or maybe it is, but this is in line with what I do professionally.)
Once I had all the individual pieces designed, I got them cut out for assembly.


Back of the card with the tabs poked through:

A small circle of the base color is glued to the tabs -- only the tabs, so it can still rotate -- and that hides the tan pieces and helps keep them from unfolding and coming off the base.

The next step is to add the cityscape

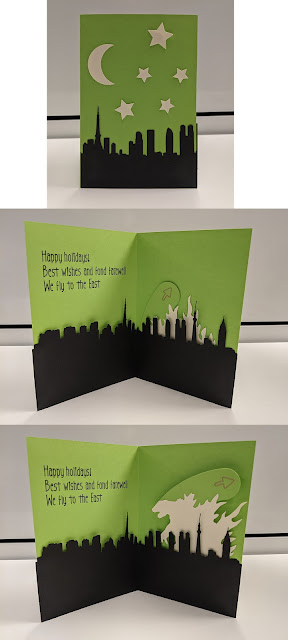
The finishing touch was a quick handwritten note at the bottom right in a silver marker. It has its imperfections, but I'm happy with the result.
I usually write something for my holiday cards. One year I wrote a poem that drew a parallel between holiday shopping/expectations and living under an overbearing regime, another year I modeled a piece after The Raven by Edgar Allen Poe (2016 was a tough holiday season), and one was a Rickroll.
For 2019, I put my Cricut to use and designed a card with a wheel-based mechanic with Godzilla as the central idea. And I wrote a haiku, because it fit the Japan theme with minimal word-writing.

I put this all together in the Cricut interface. I have some qualms with Design Space (can't rename layers, for example), but that's how it turned out. Next time I do something similar I'll use a different program.
The blue rectangle is the open card, the vertical dashed line is the score line for the center fold, and the yellow shape is the cityscape shape.

I hid the cityscape layer and placed a circle with the center roughly where I wanted the wheel hub to be, and used that to size and place the Godzilla shape and the buildings on top of it. I paid attention to where G would hit the bottom at the start position and how far it could rotate before it would be stopped by the buildings. Then I placed the buildings to find the balance between covering too little and covering too much.

To test the mechanic design, I could select both Godzilla and the circle and use the rotation tool. This is what the purple circle is for, it's not part of the final design.
There was a lot of trial and error and tweaking, but I knew the final design would work before I cut anything out.
The cityscape underwent some development, from only the inside left panel to both panels on the inside to a single shape that formed a kind of sleeve to give both the front and inside a full cityscape, plus glue tabs. (If this sounds complicated, it's not as bad as I'm describing. Or maybe it is, but this is in line with what I do professionally.)
Once I had all the individual pieces designed, I got them cut out for assembly.

I made sure to have a small circle cut in the base where the center of the circle was in the design. This is where the wheel hub is. The little tabs on the Godzilla fold up and poke through the base to the back.

Back of the card with the tabs poked through:

A small circle of the base color is glued to the tabs -- only the tabs, so it can still rotate -- and that hides the tan pieces and helps keep them from unfolding and coming off the base.

The next step is to add the cityscape

 |
| Place front and inside left, add glue to tabs for the right. This forms a pocket that Godzilla slides into. |
 |
| Inside right is in place, add glue to inside left flap (no need to glue the whole thing) and glue for the front |
 |
| close the card, fold up the cityscape, press to make everything flat |
 |
| Add moon and stars (snowflakes took too long for the number of cards I made) |
 |
| Inside starting position |
 |
| Inside end position |


Comments
Post a Comment