MYSTERY GIFT: Dragon costume
Mystery gifts are my way of thanking some of the donors to a fundraiser I did a few years ago. I ask for a theme, and then I make a thing in as much secrecy as I can manage and send it to them.
This particular theme was "dragons, dinosaurs, or dump trucks" because that's what was relevant to the child's interests. I went with dragons, because that is also relevant to my interests.


I saved myself a ton of time by starting with a Wintercroft mask template for the head. You do not have to be a pro artist to be able to assemble them, and they look amazing! Check them out.
I knew I liked this dragon head, but I also knew that I needed to make it smaller because they are designed to fit over an adult's head, not on a kid's hat.
Head #1: thin card stock/heavy paper, 100% size. It's what I had on hand and I wanted to see what the original was like before I started making adjustments. Because I am a Grade A Overachiever and wanted to make sure everything was as precise as it could possibly be, I took the time to convert the template into a format that I could use the Cricut to cut out rather than doing it by hand. It was an imperfect solution because I ended up taking a lot of time and hand-writing the numbers on every edge, but all the cuts and scores were exact. Once everything was cut out, I just followed the directions – fold where it says to fold, glue matching numbers, make sure the tabs are on the inside of the mask.


I got a feel for assembly, and obviously this template at full size is too big and paper is definitely not durable enough for a kid's costume.
Head #2: craft foam, 85%. I hand-cut the pattern this time, there are pros and cons compared to doing that vs using the Cricut but ultimately the end result was about the same and one was not noticeably faster than the other. I tried putting the mask together without tabs this time, but the angle of the glue seams were too stiff and always ended up at a slightly strange angle, so I ended up keeping the tabs.
It looked okay from the side, but I did not at all like how it looked from the front. The weight of the mask made the jaw buckle in a weird cartoony way and I was frustrated by the seams (glued edges looked stiff and pinched, unglued folds didn't keep a crease very well).

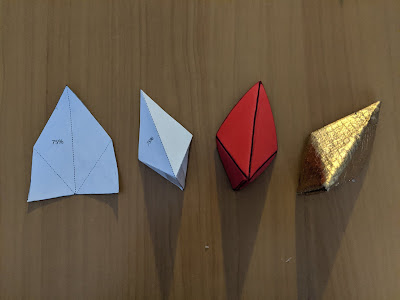
Head #3: chipboard (think cereal box cardboard), 75%.
I started with a thick chipboard for durability, but it cracked on the folds.

So I went with a very thin chipboard and hoped that with all the folds and glues that it would feel more durable as a finished product than it felt as a whole sheet. (It was!)


Visible parts of the inside of the mouth are painted black.

EL wire is hot glued on the front of the hat, behind the dragon's eyes.

With a folded sheet of packing fam to diffuse the light


Two layers of white base coat makes the final color more vivid. Somewhere around here I also added little bits of white paper clay to stop any light leakage and painted over it.

Then came two coats of a flat red to hide the brush strokes and look mostly finished.

I wanted the wings, back/tails spikes, and horns to be the same color, and that was dictated by the gold fabric I decided on. It has a fun texture and didn't seem to be too hard to work with even though I am not great with a sewing machine.
Then I took samples of all the gold paints I had to figure out which one came the closest to matching the fabric.


Once the base colors were on, I added some details like lighter colors on the edges that would catch the light and darker shades on the facets that would be in shadow to emphasize the depth.


Also glitter. Glitter on the gold to mimic the shiny quality of the wing fabric, glitter on the head just because I wanted to.


The spikes down the back are adapted from one of the pattern pieces on the head. I struggled with what kind of material to make these from, because I wanted them to be durable but not too hard to avoid injury/discomfort and also needed to attach them to the jacket. I'm not sure it was the best answer, but I settled on fabric-covered foam attached via velcro.
Actual spike assembly was a little more challenging than I thought, it took a couple tries to find the right order to fold and glue both the foam and the fabric so the fabric didn't wrinkle.

The left column of black shapes are the loops sewn to the jacket, the right column was hot glued to the spikes.


I did not want to rip the arm seam and re-sew it because I was running short on time before an international move and didn't want to risk ducking it up, so I did the best I could to hand-sew the wings securely but not take up so much real estate that the sleeves got too tight.
Paper pattern to determine wing size and shape:

The gold fabric I had was only gold on one side, so I doubled it over and used the fold to make the sleeve for the dowel.


I duplicated one of the template shapes where the jaw looks like it hinges and poked a hole through the center of that facet on both pieces. The twist tie is poked through the hole and secured around an edge.

The better option for being able to see is probably with the jaw open a bit wider. This was harder, but I'm happy with the result – I poked a second hole in the facet below the one mentioned above and put the twist ties through both.


This particular theme was "dragons, dinosaurs, or dump trucks" because that's what was relevant to the child's interests. I went with dragons, because that is also relevant to my interests.


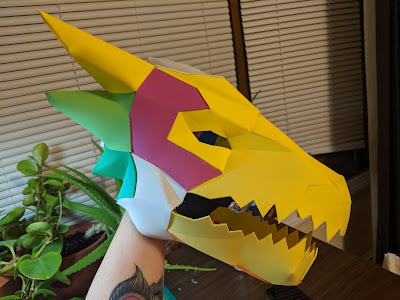
THE HEAD
I wanted to build the head around a baseball cap to avoid problems with sizing, since I am not physically near the recipient. I got hat and jacket sizes from a parent and crossed my fingers that I could get it all together before he outgrew those sizes.
I saved myself a ton of time by starting with a Wintercroft mask template for the head. You do not have to be a pro artist to be able to assemble them, and they look amazing! Check them out.
I knew I liked this dragon head, but I also knew that I needed to make it smaller because they are designed to fit over an adult's head, not on a kid's hat.
Head #1: thin card stock/heavy paper, 100% size. It's what I had on hand and I wanted to see what the original was like before I started making adjustments. Because I am a Grade A Overachiever and wanted to make sure everything was as precise as it could possibly be, I took the time to convert the template into a format that I could use the Cricut to cut out rather than doing it by hand. It was an imperfect solution because I ended up taking a lot of time and hand-writing the numbers on every edge, but all the cuts and scores were exact. Once everything was cut out, I just followed the directions – fold where it says to fold, glue matching numbers, make sure the tabs are on the inside of the mask.


 |
| I followed the directions, and yet I was still a little surprised when it turned out EXACTLY the way it was supposed to |
I got a feel for assembly, and obviously this template at full size is too big and paper is definitely not durable enough for a kid's costume.
Head #2: craft foam, 85%. I hand-cut the pattern this time, there are pros and cons compared to doing that vs using the Cricut but ultimately the end result was about the same and one was not noticeably faster than the other. I tried putting the mask together without tabs this time, but the angle of the glue seams were too stiff and always ended up at a slightly strange angle, so I ended up keeping the tabs.

It looked okay from the side, but I did not at all like how it looked from the front. The weight of the mask made the jaw buckle in a weird cartoony way and I was frustrated by the seams (glued edges looked stiff and pinched, unglued folds didn't keep a crease very well).

I started with a thick chipboard for durability, but it cracked on the folds.

So I went with a very thin chipboard and hoped that with all the folds and glues that it would feel more durable as a finished product than it felt as a whole sheet. (It was!)
 |
| I would have liked to smooth these seams a bit more, but that's a goal for another time. |
Painting and assembly
Properly sized to fit on top of the baseball cap. The back of the head is above the adjustment strap, and the teeth rest on the bill, and I used bookbinding glue to stick them together.

Visible parts of the inside of the mouth are painted black.

EL wire is hot glued on the front of the hat, behind the dragon's eyes.

With a folded sheet of packing fam to diffuse the light


Two layers of white base coat makes the final color more vivid. Somewhere around here I also added little bits of white paper clay to stop any light leakage and painted over it.

Then came two coats of a flat red to hide the brush strokes and look mostly finished.

I wanted the wings, back/tails spikes, and horns to be the same color, and that was dictated by the gold fabric I decided on. It has a fun texture and didn't seem to be too hard to work with even though I am not great with a sewing machine.
Then I took samples of all the gold paints I had to figure out which one came the closest to matching the fabric.


Once the base colors were on, I added some details like lighter colors on the edges that would catch the light and darker shades on the facets that would be in shadow to emphasize the depth.


 |
| Dark purple gumline on the top jaw because that would be in shadow, gold gumline for the bottom jaw because it would be pointing toward the light |
Also glitter. Glitter on the gold to mimic the shiny quality of the wing fabric, glitter on the head just because I wanted to.

THE BODY
I had a jacket and a length of additional fleece fabric (fleece hides stitches very well and is also comfy to wear, both were important for this). There was some trial and error with size and exact shapes, but these are the paper patterns for the tail and the spikes down the back.


The spikes down the back are adapted from one of the pattern pieces on the head. I struggled with what kind of material to make these from, because I wanted them to be durable but not too hard to avoid injury/discomfort and also needed to attach them to the jacket. I'm not sure it was the best answer, but I settled on fabric-covered foam attached via velcro.

Actual spike assembly was a little more challenging than I thought, it took a couple tries to find the right order to fold and glue both the foam and the fabric so the fabric didn't wrinkle.

The left column of black shapes are the loops sewn to the jacket, the right column was hot glued to the spikes.


WINGS
I did want to have the wings be longer than the sleeves, with a dowel inside for a more satisfying flapping experience.I did not want to rip the arm seam and re-sew it because I was running short on time before an international move and didn't want to risk ducking it up, so I did the best I could to hand-sew the wings securely but not take up so much real estate that the sleeves got too tight.
Paper pattern to determine wing size and shape:

The gold fabric I had was only gold on one side, so I doubled it over and used the fold to make the sleeve for the dowel.


FINISHING TOUCH: optional lower jaw
I struggled with this, too, not sure if I should include the lower jaw or not, and ended up with two ways to attach it if desired. Magnets would have been too bulky, velcro would have been too obvious, so I went with poked holes and wire twist-ties.
As designed, the jaw fits so close to the rest of the head that I thought it would obscure too much vision at this size and placement (but I wanted to offer it as an option nonetheless)

I duplicated one of the template shapes where the jaw looks like it hinges and poked a hole through the center of that facet on both pieces. The twist tie is poked through the hole and secured around an edge.

The better option for being able to see is probably with the jaw open a bit wider. This was harder, but I'm happy with the result – I poked a second hole in the facet below the one mentioned above and put the twist ties through both.

End result: happy kid!


Fun fact:
At first I thought I was going to write and produce another book, because Husband and I had already outlined a story inspired by a former foster cat. I even had an opportunity to take a webinar about Little Golden Book style book cover illustration hosted by RetroSupply and designed a cover for the book, but then decided a costume was a better choice in this situation. Maybe I'll get back to the book idea eventually.


Comments
Post a Comment