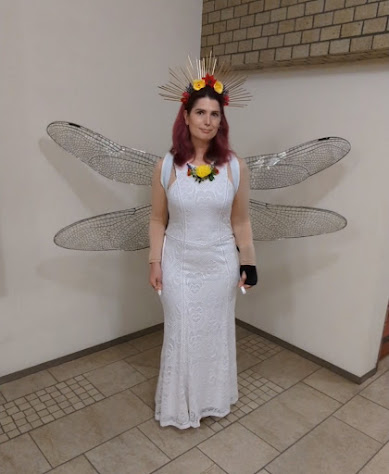
Posts

Illustration pen pal: octopus card

Image
My illustration pen pal loaned me another Griffin and Sabine book, and I returned it with a handmade card. This one plays around with the format, and features an octopus holding a message in a bottle. Process video: I ended up making several of these, but I think I want to go back and adjust the design a bit. I love the look of the suckers being cut from the front piece of paper to reveal the back, but the finer details are hard for the Cricut to handle without tearing. This card also doesn't fit into a standard envelope. The plan is to make at least one alternate version of this concept that is easy to replicate, to be added to my (brand new!) Etsy store , which currently features kokeshi doll cards .

Stencil and Hand Painted Sign

Image
I was commissioned to make two stencils (2 feet wide and 4 feet wide) and to hand paint a 2' wooden sign. Design I ended up combining characteristics from three different versions of the fraternity crest design to make the client's ideal version, and then I converted it to a single color graphic with added support bars for when it was cut out of the final material. Reference images from https://oppf.org/ , theshieldmaker , and wallpaperuse.com Stencils There was significant research and experimentation with different ways to physically produce the stencil. Maker spaces did not offer a work space large enough to produce the stencil at either of the final sizes (2 feet in diameter or 4 feet in diameter) and generally focused on laser cutting, which is a bad idea for most types of plastic. Ultimately I opted to produce it at home with my Cricut. Materials testing: this is not the right kind of plastic N OTE TO CRICUT USERS: 1mm plastic is too thick and acrylic thicker than a trans

Waterfall Cards

Image
I made two waterfall cards with very different visual flavors. Both are adaptations from one of these tutorials from Mixed Up Craft , but with different proportions so I needed a few prototypes to get all the math right. The first one was for a sakura-themed baby shower. Nearly everything on my friend's registry was already spoken for other than a gift card, so to give that a more personal presentation I made the waterfall card. Here's the final! If you want to see my trial and error, here's the process: The second one was the original goal, but harder to implement because of the dimensions of the cards. This is, however, the more clever card because it was given to a magician, and there's a classic card flourish called a waterfall. So this is a waterfall card made of a waterfall of cards! Final product (minus the outer shell): Prototype plus final:

Holiday Cards: Kokeshi

Image
My holiday cards for 2021 were inspired by Japanese kokeshi dolls , modified from the version I made for a pen pal earlier in the year. SO excited to finally have an excuse to use some of this gorgeous handmade Japanese paper! I'd had my eye on that green pattern since the first time I laid eyes on it. Bonus, I also found good holiday colors (for Christmas, Hanukkah, and New Year's) and a pattern appropriate for the Year of the Tiger. The process is pretty straightforward: sketch what the final should look like (or, in this case, lift from a previous project to modify) trace into vector shapes in design software, resize to fit into regular-postage envelope (black rectangle). The lines are instructions for the Cricut – the gold lines are to be drawn with a gold marker, the magenta lines are for cutting a slot for the obi (waist sash) to slide through, and the vertical cyan lines are score lines for folding. I make 50-60 cards every year, I want to make sure they're as consi

Mystery Gift: Kitty Glitter

Image
Mystery gifts are my way of thanking some of the donors to a fundraiser I did some years ago. I ask for a theme, and then I make a thing in as much secrecy as I can manage and send it to them. This gift's theme is Kitty Glitter, for someone who loves her tabby cat, her garden, cherry blossoms, and things that are pink and sparkly. Here's the short version of how it was made (30 seconds): And here's a more complete version (4 minutes): Lessons learned, materials used Okay craft nerds, this part is for you. During the trial and error phase of figuring out what the base mask should be made of, I tried revisiting the pattern I made for my Bast mask. I didn't love that overall mask shape to begin with, but thought I might be able to improve upon it. I was mistaken . I couldn't even get it to look like the original, I'm not sure how that happened. I also tried using Crayola Model Magic on a wig head because it's pretty light, but I'm not a sculptor and it jus

Silk and Pearls Anniversary

Image
Every wedding anniversary is associated with  specific items . The first year is the paper anniversary, the 50th is the golden anniversary, etc. A few years back we started taking photos of ourselves with those items. The traditional items for the 12th anniversary are silk or linen (traditional) or pearls (modern). Husband has a (probably) silk brocade jacket, so that set the formalwear tone. I made spider and pearl accessories to go with them. I started with a faux pearl necklace that looks like a spiderweb. After some sketches and image searches I realized that what makes it read as a spiderweb is if the curved segments curve up . It's not how it would happen in real life because of gravity, but even in my sketches if the arcs drooped down it looked more like a chandelier than a spiderweb.  The three strands that make up the main part of the necklace were harder than I expected, both to get the lengths right and to get all three to lay flat against my neck. But it works! Not b

Amabie costume

Image
In 2020, a fairly obscure yokai called  Amabie  started to trend on Japanese Twitter with #AmabieChallenge.  There are variations to the story, but the legend says that a mermaid-like creature with long hair, a beak, scales, and three legs or fins emerged from the sea in the late 1800s to give a warning and advice. It predicted six years of good harvest and then a pandemic. To stave off the disease, Amabie said to draw its picture and show that picture to as many people as possible. Since this whole concept was still relevant in 2021 but not bad enough to cancel Halloween altogether, and Amabie has become near and dear to my heart, that's what I did. Process Beak There are two parts to the beak, the beak itself and the mask to hold it to my face (note: also thematically appropriate). While I was developing the beak from paper and then craft foam, I was also looking for me-colored masks to attach the beak to. Both of these took a few tries and some trial and error, but the end resul

Illustration pen pal: kokeshi card holder

Image
 My illustration pen pal loaned me another  Griffin and Sabine book , and I returned it with a card holder inspired by modern kokeshi dolls . Process the process almost always starts with a sketch Some math was done to determine how big the finished doll should be then the sketch was traced and I used a grid to enlarge the sketch to the final size using the new drawing, I split out the individual pieces to be cut out The body (red) is cut from craft foam, the other pieces are cut from paper The patterned paper at the bottom is usually used for origami Front and back of assembled doll Front and back of finished doll holding the folded letter

Illustration pen pal: puzzle

Image
My illustration pen pal loaned me another  Griffin and Sabine book , and I returned it with a letter and a puzzle. I already had a mandala design from a workshop years ago, so I started there. I made some tweaks and printed it out to decide what the colors should be like. Thanks to radial symmetry, I could get four different looks on the same sheet. Top: white background, rainbow shapes on left and metallics on right Bottom: black/white shapes on rainbow background left, metallic background right  Puzzles are made of chipboard (what hardcover books use, a little more hardcore than a cereal box) Let's feed that into the Cricut and see what happens Good news: the Cricut can handle drawing all the lines at this size, and it will successfully cut out all those puzzle shapes Bad news: all those frayed edges are not gonna work for me Second attempt: puzzle re-drawn and re-cut on two sheets of cover stock glued together instead of chipboard. A little less solid, but much smoother! An addi