Every wedding anniversary is associated with specific traditional items. You might have heard that first year is the paper anniversary, the 50th is the golden anniversary, stuff like that. A few years back we started taking photos of ourselves with those items.
This year is our steel anniversary. Given the dumpster fire that 2020 has turned out to be, we went for a post-apocalyptic warrior vibe.
I got some patterns for shoulder, chest, and knee armor and made them out of foam and we decorated them with pieces of steel. There are a lot of ways to do post-apocalypse armor, but I feel like shoulder and chest armor really defines the look.
Husband's aesthetic was "rolled through a scrapyard" and he stuck wire mesh, nails, and screws on his.
My go-to for random things is the ¥100 store and most of the options for steel are kitchen implements, so I used three collapsible steamer trays, a couple of graters, and a bunch of spoons.
Process
Chest/shoulder armor for him
Shoulders for him
Chest armor for him
Strap connecting the pauldrons (later replaced with chain)
I didn't want foam for my chest armor, just metal like a huge necklace. I traced the neckline of a tank top for a pattern and made a kind of bib out of faux leather to hold everything together.
D-rings on the shoulders to attach the pauldrons with velcro strips as seen in this tutorial
Two types of collapsible steamer trays were disassembled and rearranged:
I pinned the individual pieces to the dress form to see how it looked, and when it felt right, I wired the rows of metal together then sewed them here and there to the bib so they'd stay in place. I also ended up adding a belt right below the ribcage for a more secure fit.
I couldn't find anything big and cone-shaped made out of metal, so I used paper clay and a 3D-printed mold to help keep them consistent in size and proportion
Spike locations marked; I don't know if I'd use paper clay for this again, they ended up being very fragile, the tips broke and the spikes popped off repeatedly
Other pieces
Husband went relatively minimalist – shoulder/chest armor and a gas mask. I am much more inclined to decoration, so I also made bracers and knee guards and added a generous amount of studs and spikes.
Faux leather cut to fit my forearms
Eyelets are fun, and easy with the right tools
SPOONS!
Knee guards, elastic strap to keep them in place with velcro on one side
Knee guards with steamer tray petals and studs
Needed something shiny at my waist, so I added chains and graters
Add some extra large serving spoons I'm totally ready for the apocalypse
My illustration pen pal loaned me another Griffin and Sabine book, and I returned it with a handmade card. This one plays around with the format, and features an octopus holding a message in a bottle. Process video: I ended up making several of these, but I think I want to go back and adjust the design a bit. I love the look of the suckers being cut from the front piece of paper to reveal the back, but the finer details are hard for the Cricut to handle without tearing. This card also doesn't fit into a standard envelope. The plan is to make at least one alternate version of this concept that is easy to replicate, to be added to my (brand new!) Etsy store , which currently features kokeshi doll cards .
Don't want to read? Here's a 2-minute video instead! The concept for my 2023 Halloween costume was the Starbucks siren, as seen in their logo (although taking some artistic license to wear clothing from the waist up and not doing gymnastics, so we're not going for 100% accuracy). Image from https://www.linkedin.com/pulse/starbucks-logo-evolution-tale-design-history-kaizen-tech-global My starting point was the leggings from my Amabie costume and a green bodice I got a million years ago (intending to make a Poison Ivy, although that has yet to happen). Phase 1: Bodice The first step was to add scales to the bodice to match the leggings as much as possible. I used my scan of the leggings from Amabie to make shapes to send to the Cricut to cut out of fabric. I wasn't convinced that sticky vinyl would stay put on the satin, so I ended up backing some polyster with fusable interfacing for durability and hand sewed it on. This was a beast of a project, but it was the best wa...
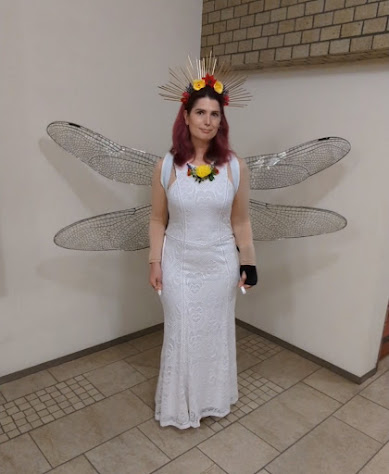
The original plan was to go as a dragonfly, but the thing about dragonfly wings is that they stick out perpendicular to the body. This is not practical for moving around a small apartment or a crowded city, so they needed to be able to move. And then the wings took so much time that I just couldn't pull together anything else for a dragonfly (I also couldn't decide how to handle the eyes). So I pulled a white dress out of my closet (from my Bast costume), made a quick zip tie crown, and called it a fairy queen. The moving wings required a TON of trial and error. This was the first concept test. Gears may have been a more solid construction if they had worked, but it didn't end up being practical. It went from gears to pulleys, then there were changes in the placement and pulling mechanisms, then figuring out how to keep the wings from hitting each other, then testing which direction to pull (around the waist or over the shoulder), then how to divide the wings so each h...


I have Loved all your anniversary shots. (PaulS)
ReplyDelete