Posts

Showing posts with the label costume

Color changing glasses frames

Image
Okay, technically the glasses themselves do not change color, they have removable/reversible frame toppers that attach via magnets. But in practical terms, I was commissioned to make these so that a drag queen could surprise the audience with the color change, and it's a snappier title, so that's what I'm going with. I am delighted that I had the opportunity to make some custom glasses toppers for a drag performer, adding magnets and making frame toppers to give the illusion of the glasses changing color.   Full process video:   Prototype 1  First step: dremel some holes and glue in magnets   This project was a first for me, so I did a fair amount of material testing to prototype before modifying the final glasses frames. If you're trying this at home, read the glue labels! Not every superglue out there will bind metal to plastic, but that glue does exist.   For the toppers, some materials like paper and balsa wood didn’t work out well, but thin chipboard ...

Horn Headband

Image
Sometimes a set of horns is just what you need to pull an outfit together. In this case, these were horns for a Krampus party.  Don't want to read? Here's a video! If photos and text are better, carry on: Shoutout to  Lost Wax , I used one of his templates for this. Paper pattern transferred to 5mm foam and cut out Letters and registration marks matched to glue the horns together! I used hot glue, but contact glue would also work (I was not patient enough for contact glue) The horns are glued together. Now to decorate them! Applying foam clay (love this stuff!) to the horns like Kamui Cosplay does here One down, one to go Horns sculpted, now to make them wearable I used circles of 2mm foam sheet with two slits cut across the middle to secure the horns to a headband Then the bases of the horns were hidden by hot gluing down some black satin ribbon Hot glue on some fake flowers and we're done!

Starbucks Siren Costume

Image
Don't want to read? Here's a 2-minute video instead! The concept for my 2023 Halloween costume was the Starbucks siren, as seen in their logo (although taking some artistic license to wear clothing from the waist up and not doing gymnastics, so we're not going for 100% accuracy). Image from  https://www.linkedin.com/pulse/starbucks-logo-evolution-tale-design-history-kaizen-tech-global My starting point was the leggings from my Amabie costume and a green bodice I got a million years ago (intending to make a Poison Ivy, although that has yet to happen). Phase 1: Bodice The first step was to add scales to the bodice to match the leggings as much as possible. I used my scan of the leggings from Amabie to make shapes to send to the Cricut to cut out of fabric. I wasn't convinced that sticky vinyl would stay put on the satin, so I ended up backing some polyster with fusable interfacing for durability and hand sewed it on. This was a beast of a project, but it was the best wa...

Fairy Queen costume

Image
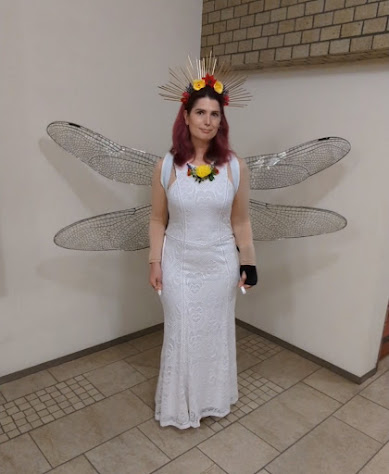
The original plan was to go as a dragonfly, but the thing about dragonfly wings is that they stick out perpendicular to the body. This is not practical for moving around a small apartment or a crowded city, so they needed to be able to move.  And then the wings took so much time that I just couldn't pull together anything else for a dragonfly (I also couldn't decide how to handle the eyes). So I pulled a white dress out of my closet (from my  Bast  costume), made a quick zip tie crown, and called it a fairy queen. The moving wings required a TON of trial and error. This was the first concept test. Gears may have been a more solid construction if they had worked, but it didn't end up being practical. It went from gears to pulleys, then there were changes in the placement and pulling mechanisms, then figuring out how to keep the wings from hitting each other, then testing which direction to pull (around the waist or over the shoulder), then how to divide the wings so each h...

Mystery Gift: Kitty Glitter

Image
Mystery gifts are my way of thanking some of the donors to a fundraiser I did some years ago. I ask for a theme, and then I make a thing in as much secrecy as I can manage and send it to them. This gift's theme is Kitty Glitter, for someone who loves her tabby cat, her garden, cherry blossoms, and things that are pink and sparkly. Here's the short version of how it was made (30 seconds): And here's a more complete version (4 minutes): Lessons learned, materials used Okay craft nerds, this part is for you. During the trial and error phase of figuring out what the base mask should be made of, I tried revisiting the pattern I made for my Bast mask. I didn't love that overall mask shape to begin with, but thought I might be able to improve upon it. I was mistaken . I couldn't even get it to look like the original, I'm not sure how that happened. I also tried using Crayola Model Magic on a wig head because it's pretty light, but I'm not a sculptor and it jus...