Mystery Gift: Kitty Glitter
Mystery gifts are my way of thanking some of the donors to a fundraiser I did some years ago. I ask for a theme, and then I make a thing in as much secrecy as I can manage and send it to them.


I used none of them. I ended up going with a pack of regular pink paper from the ¥100 store. Most of the papers I had collected weren't sparkly enough or didn't end up being the right color or weren't sparkly on both sides or didn't hold a curl, and I really wanted the blossoms to have that extra bit of dimension. But if I need this for something else later, I have it!
This was my first time using Bendt Cosplay Foam Clay (branches) and Aladine Izink Diamond glitter paint, and they are great! The foam clay is fairly durable, moderately flexible even when dry, and can be molded, sanded, and painted. Not great for ultra fine details or very sharp points, but perfect for what I was doing here.

The Izink glitter paint is bonkers. It’s intended for textile design and it’s so intense it’s usually applied with a palette knife. According to all the YouTube videos I watched about it, it can provide 100% coverage, even on dark fabric, and if you’ve applied it correctly you can actually put it in the washing machine. And it looks SO GOOD. I did paint the mask first with regular acrylic/craft paint to roughly guide the levels of gradient and in case I didn't apply the glitter thick enough it wouldn't be painfully obvious. I used white and three shades of cyan and blue. The cyan and royal blue were the easiest to blend, just phenomenal. The ice blue was great for texture but the hue just didn't blend as gracefully. The white was the most difficult to work with, probably because it's the most subtle sparkle and the texture was the most like sand. I didn't try to blend the pink and magenta together as a gradient, but they would probably blend very well.

The silver is a metallic silver acrylic that I already had (either FolkArt or nüro), coated with a regular glitter paint (DecoArt) that is less intense than the Izink. The bridge of the nose and the snoot both have a subtle gradient that gets darker as it gets lower.
I did some testing on the extra ears to decide if I wanted the sky to be regular paint or glitter paint, and if I wanted the clouds to be acrylic, glitter, polyester batting (pillow stuffing), or some combination of those. The batting added some neat dimension, but the strands cast just enough shadow to change the color from bright white to a very light gray, and I really wanted them to pop. I ended up going with glitter paint sky and white acrylic painted clouds accented with some white glitter paint, but the white glitter is so subtle you can't really tell.

I used Tacky Glue and Lineco bookbinding glue for the branches and flowers and the rhinestones on the final mask. Tacky Glue is a good multipurpose adhesive, and I have been impressed with the Lineco glue for its strength since I used it for making the cover of the pop up book. Both dry clear.
I learned that super glue is NOT the right glue for rhinestones because it breaks up the reflective coating on the backs and takes away the sparkle.
I'm pretty sure the glitter paint didn't really need to be spray sealed, but since this was my first time using it and didn't use it in the way it was designed to be used, I wanted to be extra sure I wasn't gifting a time-release glitter bomb. I learned that I should do the spray sealing before adding the rhinestones because the spray tends to frost them, further reducing the sparkle. This is why I made two - one to learn all the lessons, the other to apply them.
Products:
This gift's theme is Kitty Glitter, for someone who loves her tabby cat, her garden, cherry blossoms, and things that are pink and sparkly.
Here's the short version of how it was made (30 seconds):
And here's a more complete version (4 minutes):
Lessons learned, materials used
Okay craft nerds, this part is for you.
During the trial and error phase of figuring out what the base mask should be made of, I tried revisiting the pattern I made for my Bast mask. I didn't love that overall mask shape to begin with, but thought I might be able to improve upon it. I was mistaken. I couldn't even get it to look like the original, I'm not sure how that happened.

I also tried using Crayola Model Magic on a wig head because it's pretty light, but I'm not a sculptor and it just didn't do what I wanted it to do. I couldn't get it smooth, and the wig head was definitely not the right model. It fit my face weird, it smelled like glue, and it just didn't look good.

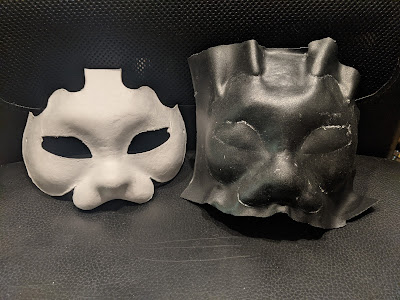
So I bought a five pack of paper pulp cat masks from some random vendor on Amazon to muck around with. I don't like the original ears, eyes, or the handlebar mustache mouth, but that area between the eyes, down the bridge of the nose, and the whisker pads are really hard to make from scratch.

I used the Model Magic to make adjustments to the paper mask like changing the eye shape and adding more definition to the brows and cheekbones. The overall result was smoother, but then when it dried I looked at it too hard and it cracked.

I thought while I was replacing the ears I would add a layer of thermoplastic to the back of a paper pulp mask and use that to adjust the shape a little so it would appear more narrow from the front. I thought the Worbla would stick to it, but I got a nearly flawless impression instead. I will file this information away in my brain for future reference.
I used triangles of thermoplastic for the ears of the practice mask and a 1 or 1.5mm chipboard for the ears of the final mask. Both are a bit top heavy as a result, but the overall weights are within a few grams of each other. I am not very good at working with thermoplastic yet, so I had slightly better results with the chipboard, the curves were more even. Replacing the ears and sealing the gaps with a slice of craft foam helped with the general curvature, I didn't feel like I needed to add any thermoplastic reinforcement to the inside of the mask.

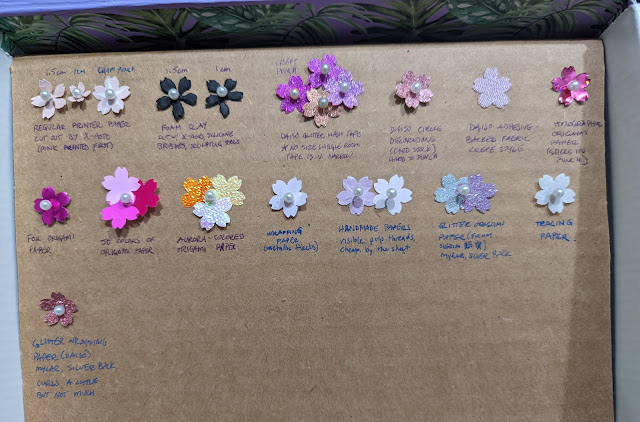
I wasn't sure what to use for the blossoms, so while I was in the early stages of designing and figuring out the base material, I collected different materials like craft foam, origami paper, wrapping paper, self-adhesive fabric, handmade paper, and printing or craft paper. I found a cherry blossom paper punch and made something like a butterfly box to display them along with notes about how well it worked and where I got it.
I used none of them. I ended up going with a pack of regular pink paper from the ¥100 store. Most of the papers I had collected weren't sparkly enough or didn't end up being the right color or weren't sparkly on both sides or didn't hold a curl, and I really wanted the blossoms to have that extra bit of dimension. But if I need this for something else later, I have it!
This was my first time using Bendt Cosplay Foam Clay (branches) and Aladine Izink Diamond glitter paint, and they are great! The foam clay is fairly durable, moderately flexible even when dry, and can be molded, sanded, and painted. Not great for ultra fine details or very sharp points, but perfect for what I was doing here.

The Izink glitter paint is bonkers. It’s intended for textile design and it’s so intense it’s usually applied with a palette knife. According to all the YouTube videos I watched about it, it can provide 100% coverage, even on dark fabric, and if you’ve applied it correctly you can actually put it in the washing machine. And it looks SO GOOD. I did paint the mask first with regular acrylic/craft paint to roughly guide the levels of gradient and in case I didn't apply the glitter thick enough it wouldn't be painfully obvious. I used white and three shades of cyan and blue. The cyan and royal blue were the easiest to blend, just phenomenal. The ice blue was great for texture but the hue just didn't blend as gracefully. The white was the most difficult to work with, probably because it's the most subtle sparkle and the texture was the most like sand. I didn't try to blend the pink and magenta together as a gradient, but they would probably blend very well.

The silver is a metallic silver acrylic that I already had (either FolkArt or nüro), coated with a regular glitter paint (DecoArt) that is less intense than the Izink. The bridge of the nose and the snoot both have a subtle gradient that gets darker as it gets lower.
I did some testing on the extra ears to decide if I wanted the sky to be regular paint or glitter paint, and if I wanted the clouds to be acrylic, glitter, polyester batting (pillow stuffing), or some combination of those. The batting added some neat dimension, but the strands cast just enough shadow to change the color from bright white to a very light gray, and I really wanted them to pop. I ended up going with glitter paint sky and white acrylic painted clouds accented with some white glitter paint, but the white glitter is so subtle you can't really tell.
I used Tacky Glue and Lineco bookbinding glue for the branches and flowers and the rhinestones on the final mask. Tacky Glue is a good multipurpose adhesive, and I have been impressed with the Lineco glue for its strength since I used it for making the cover of the pop up book. Both dry clear.
I learned that super glue is NOT the right glue for rhinestones because it breaks up the reflective coating on the backs and takes away the sparkle.
 |
| Upper gems: superglue made the backing crackly Lower gems: superglue made them look milky instead of clear Both: look a bit frosted after the spray sealant |
• paper pulp cat masquerade mask • Worbla (practice mask ears) • thin chipboard, 1-1.5 mm (final mask ears)
• ¥100 store color paper (for blossoms)
• 2mm craft foam (for inside the mask, under the ears)
• Gesso (for priming the base mask)
• Tacky Glue and/or Lineco bookbinding glue
• clear lacquer spray (probably optional)
• ¥100 store rhinestones in assorted sizes
• ribbon
*This was the only water-based paint I could find in my area in the cyan-blue color I wanted, it's a Japanese brand of water-based silicone acrylic. I couldn't find the exact product line on the website. It's a bit thinner/more translucent than I would have liked and I probably won't buy it again.


Comments
Post a Comment