Bast and Anubis
This year's costumes were the Egyptian gods Bast and Anubis.


Translation of paper shapes into craft foam shapes

Articulation of the cheekbones and brow ridges (so it wouldn't look so much like a duck).

Lights in the eyes: a strip of red LEDs wrapped around the baseball cap under the foam face. The foam cheekbones aren't glued down to allow access to the lights just in case it was needed. The LEDs are diffused by a few layers of packing foam. In real life you can see the points of the lights, but it photographs well.

Ears added, some black paper clay added to smooth out the shapes, then layers and layers of glues to seal it. Not as smooth as I would have liked, but looked fine from a distance.
The nose is paper clay that had started to dry, which gave it the perfect dog nose texture completely by accident.

Paint! Acrylic paint, gold glitter paint, and a thick spray lacquer. The LEDs were covered with masking tape during this step.

Headdress to hide the extra lights and give a little more Egyptian god flare, made of squishy foam to smooth the back of the head, covered in a royal blue spandex fabric.

Gold ribbon added to the blue headdress, small Velcro bit added at the cheekbones to keep the fabric close to the head but still allow access to the cheekbones and lights if needed.

Beaded collar. I started by tracing the front and back of a tee shirt to get the right not-quite-half-circle shape. Then I used a lot of hot glue and added shiny gold rope and short strings of beads. For the bead strings, I drew a line of glue, placed the beads in it, used a needle to put the beading string through the fabric, then hot glued the knot. If the hot glue gave out, the thread would keep it in place, and vice versa. Craft wire was sewn to the ends as a super simple clasp.


The forehead was pure trial and error, but it turned out all right.

Shapes approved, make it again in black!

Paint!

During the paint process, I added a headband. I had thought I was going to wear a black bodysuit and hood and attach the mask by magnets, but it didn't work out that way, so...headband!

I bought a variety pack of EL wire to help me decide which color I wanted to line the eyes. EL wire is great to work with! It doesn't do acute angle corners, but it's forgiving and easy to sew or glue. Nice and light, other than the battery pack. The batteries were too heavy to attach to the mask, but it worked out well enough being clipped to the back of my dress. It messed with my night vision, so I backed it with tan felt, and that helped.

I set out beads to figure out how I wanted it to look. At first I thought I was going to bead the entire necklace, but then I came to the realization that I had neither the time nor skills to do such a thing, so three cheers for hot glue!
The fabric shape was traced from a tee shirt collar (not quite a half circle, a little squashed), and then everything was both sewn and glued in place. Glue to mark the spot, short bead strings laid in the glue, then the thread was pushed through to the other side of the fabric, knotted, and glued in place.


Because I was going to wear that black bodysuit, clothing plans were to make myself a skirt and belt and embellish a bra akin to a belly dance costume, but that didn't end up working out. Husband opted for formalwear for Anubis, the color scheme for which tended toward black and red, so to be different I opted to emphasize blue and white. If I did it again, I might choose differently.
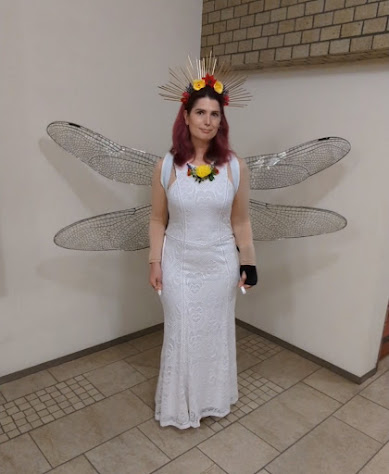
I got lucky and found a white dress with an appropriate fit on the clearance rack of a GUESS store.

The Egyptian look often has a wrapped skirt or belt with a flap hanging down the front from the waist. That was easy enough to replicate (at least enough to give the right impression), and this would also allow me to add a couple pockets to carry my phone and ID/money/etc.
I used some gold satin to make a belt, no pattern, all trial and error with wrapping and pinning.

The fabric hanging down the front lent itself best to pockets. One at the top for the phone, one along the side for ID, money, event tickets, and whatever else I might need to carry. I thought I was going to have the pockets stacked, but I didn't have time to plan it properly and ended up having to improvise a little.
Bracelets and arm bands were made by the same method: cut foam into rectangles, line the top and bottom edges with craft wire to hold the shape, glue in sequins and fancy blue ribbon, and wear!
Then discover that the craft wire is incredibly annoying to wear and replace it with elastic (last image).

Details: heavy eye makeup (I didn't wear the mask over my face all the time) and teal/blue nail polish with gold sparkles.

All in all, I'm happy with how the Anubis head came out, but I don't feel like this has been my best work. Maybe I'll be satisfied with my efforts next year.


Onward, to next year's costume!

Anubis
I had a more clear vision of what I wanted for Anubis, so I started there.
I opted to build it on a baseball cap instead of as a mask to give the appearance of a longer neck, and that was definitely the way to go.
Clumsy paper template, edges removed from the hat bill, then a less clumsy paper template to get the basic shapes right.

Translation of paper shapes into craft foam shapes

Articulation of the cheekbones and brow ridges (so it wouldn't look so much like a duck).

Lights in the eyes: a strip of red LEDs wrapped around the baseball cap under the foam face. The foam cheekbones aren't glued down to allow access to the lights just in case it was needed. The LEDs are diffused by a few layers of packing foam. In real life you can see the points of the lights, but it photographs well.

Ears added, some black paper clay added to smooth out the shapes, then layers and layers of glues to seal it. Not as smooth as I would have liked, but looked fine from a distance.
The nose is paper clay that had started to dry, which gave it the perfect dog nose texture completely by accident.

Paint! Acrylic paint, gold glitter paint, and a thick spray lacquer. The LEDs were covered with masking tape during this step.

Headdress to hide the extra lights and give a little more Egyptian god flare, made of squishy foam to smooth the back of the head, covered in a royal blue spandex fabric.

Gold ribbon added to the blue headdress, small Velcro bit added at the cheekbones to keep the fabric close to the head but still allow access to the cheekbones and lights if needed.

Beaded collar. I started by tracing the front and back of a tee shirt to get the right not-quite-half-circle shape. Then I used a lot of hot glue and added shiny gold rope and short strings of beads. For the bead strings, I drew a line of glue, placed the beads in it, used a needle to put the beading string through the fabric, then hot glued the knot. If the hot glue gave out, the thread would keep it in place, and vice versa. Craft wire was sewn to the ends as a super simple clasp.

Bast
Another clumsy paper template, refined through a ton of trial and error (and modification of Anubis's cheekbone template). The forehead never quite worked out in paper.

The forehead was pure trial and error, but it turned out all right.

Shapes approved, make it again in black!

Paint!

During the paint process, I added a headband. I had thought I was going to wear a black bodysuit and hood and attach the mask by magnets, but it didn't work out that way, so...headband!

I bought a variety pack of EL wire to help me decide which color I wanted to line the eyes. EL wire is great to work with! It doesn't do acute angle corners, but it's forgiving and easy to sew or glue. Nice and light, other than the battery pack. The batteries were too heavy to attach to the mask, but it worked out well enough being clipped to the back of my dress. It messed with my night vision, so I backed it with tan felt, and that helped.

I set out beads to figure out how I wanted it to look. At first I thought I was going to bead the entire necklace, but then I came to the realization that I had neither the time nor skills to do such a thing, so three cheers for hot glue!
The fabric shape was traced from a tee shirt collar (not quite a half circle, a little squashed), and then everything was both sewn and glued in place. Glue to mark the spot, short bead strings laid in the glue, then the thread was pushed through to the other side of the fabric, knotted, and glued in place.


Because I was going to wear that black bodysuit, clothing plans were to make myself a skirt and belt and embellish a bra akin to a belly dance costume, but that didn't end up working out. Husband opted for formalwear for Anubis, the color scheme for which tended toward black and red, so to be different I opted to emphasize blue and white. If I did it again, I might choose differently.
I got lucky and found a white dress with an appropriate fit on the clearance rack of a GUESS store.

The Egyptian look often has a wrapped skirt or belt with a flap hanging down the front from the waist. That was easy enough to replicate (at least enough to give the right impression), and this would also allow me to add a couple pockets to carry my phone and ID/money/etc.
I used some gold satin to make a belt, no pattern, all trial and error with wrapping and pinning.

The fabric hanging down the front lent itself best to pockets. One at the top for the phone, one along the side for ID, money, event tickets, and whatever else I might need to carry. I thought I was going to have the pockets stacked, but I didn't have time to plan it properly and ended up having to improvise a little.
 |
| Judging by the reactions I got when I wore this to the office party, the pockets were the most exciting feature of the whole costume. I was sure it wold be the lights in the mask, but no. |
Bracelets and arm bands were made by the same method: cut foam into rectangles, line the top and bottom edges with craft wire to hold the shape, glue in sequins and fancy blue ribbon, and wear!
Then discover that the craft wire is incredibly annoying to wear and replace it with elastic (last image).

Details: heavy eye makeup (I didn't wear the mask over my face all the time) and teal/blue nail polish with gold sparkles.

All in all, I'm happy with how the Anubis head came out, but I don't feel like this has been my best work. Maybe I'll be satisfied with my efforts next year.


Onward, to next year's costume!


Comments
Post a Comment